
Oh, da ! imi plac ochetii metalici. Imi place sa lucrez cu ei....
Oh, yes! I'm in love with eyelets. I loke working with them ....

Hai sa va arat cum se monteaza, doar pentru ca diversitatea utilizarii lor este inepuizabila si ...prinde bine ;)
Let me show you how I set them on...just because they can be used in so many places....and it's good to know ;)
Introducere: ochetii se gasesc in diferite marimi, in diferite culori...ca voi sa-i puteti asorta cu piesa finala. Incepind de la 4mm pina la ....wow ! 12 mm la mine in tara sau 40mm ( rapizi ) in alte tari straine .LOL.
Argintii, aurii, negri sau cuprati .
Introduction : you can find eyelets in different sizes, in different colours....just good for you to can assort them with your piece. Starting from 4mm up to...wow!12 mm in my country or 40mm ( fast clip) in other countries.
Silver, gold, black or copper here and any other color you can think of abroad....


Dupa cum vedeti am in stoc cam tot ce se gaseste la noi in tara :D
As you can see my stock comprises about all I can find here in my country . LOL.
Recent am cumparat o marca noua, din magazinul KreativShop , asa ca acestia vor fi subiectii de azi . :) Sunt minunati , se lucreaza usor si sunt foarte accesibili ca pret .
Recently I buyed a new brand from KreativShop, so these will be today subjects. :) They are wonderful, they worked out easily and have an fair price.

Fiecare pachet de ocheti vine impreuna cu ustensila necesara montarii lor ( ustensila care are doua capete diferite : un perforator si un dorn pentru baterea ochetului ) plus un disc de metal care va tine in pozitia corespunzatoare ochetul la momentul baterii lui cu ciocanul . Oh, am uitat sa va spun : nu gasiti un ciocan in pachet, trebuie sa vi-l procurati dinainte :))
Each package of eyelets comes with a helping tool ( with two different ends : one for perforating, one for setting in the eyelet) and with a metal disc which will keep in proper position the eyelet when hammering over.
Oh, I forgot to tell you : you'll not find a hammer in the package, you will need to get one before starting. :))


Se incepe prin a perfora materialul unde se va pune ochetul. Se poate face gaura cu forfecuta sau cu unul din capetele ustensilei ajutatoare din pachet. Adica acesta :
Start by making the small hole in the fabric where you want your eyelet to go . With the tip of your small scissor or with one of the ends of the helping tool from the package. This one :

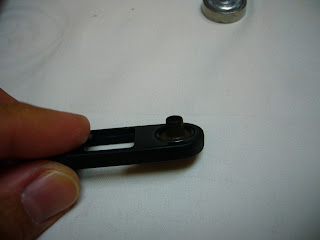
Atentie : se lucreaza pe spatele piesei .
Asezati prin gaura ochetul cu partea convexa spre fata materialului. Asezati saiba cu partea concava inspre sus si asezati totul in discul de metal . Se va potrivi la fix acolo. Apoi puneti deasupra capatul celalalt al uneltei ajutatoare ( vedeti imaginea ) si cu o miscare scurta si ferma loviti cu ciocanul peste "sandwich". Ochetul se va deschide frumos, ca o floare, peste saiba si va ramine fixat in material .
Aveti in continuare citeva imagini, dar fara material , doar ca sa se vada mai bine actiunea :
Attention : you will work from the wrong side of the piece.
Set the eyelet with the convex part on the right side of the fabric, trough the hole, set the small "washer" with the concave way up and put everything to stand right and properly into the metal disk round space. It will fit like a dream. Then put on top of this "sandwich" the setting end of the helping tool , and with a short and firm move hammer on it. The eyelet will open over the washer like a flower and will remain sett on the fabric.
You have here some steps images but without the fabric just to see better the action :


Vedeti ? nu-i asa ce frumos ies ? eu as pune acum ocheti pe toate lucrurile :))
You see ? isn't it nice ? it's addictive, believe me. I would set eyelets on everything now :))

 And this is the final piece with drawstring closing system through eyelets .


Aveti si voi niste ocheti sa incercati ? intoarceti-va cu rezultatele si cu idei noi de folosire a lor ;) Abia astept !
Do you have some eyelets to try on ? come back with results, I'm extra-curious for new uses .
Oh, yes! I'm in love with eyelets. I loke working with them ....

Let me show you how I set them on...just because they can be used in so many places....and it's good to know ;)
Introducere: ochetii se gasesc in diferite marimi, in diferite culori...ca voi sa-i puteti asorta cu piesa finala. Incepind de la 4mm pina la ....wow ! 12 mm la mine in tara sau 40mm ( rapizi ) in alte tari straine .LOL.
Argintii, aurii, negri sau cuprati .
Introduction : you can find eyelets in different sizes, in different colours....just good for you to can assort them with your piece. Starting from 4mm up to...wow!12 mm in my country or 40mm ( fast clip) in other countries.
Silver, gold, black or copper here and any other color you can think of abroad....


Dupa cum vedeti am in stoc cam tot ce se gaseste la noi in tara :D
As you can see my stock comprises about all I can find here in my country . LOL.
Recent am cumparat o marca noua, din magazinul KreativShop , asa ca acestia vor fi subiectii de azi . :) Sunt minunati , se lucreaza usor si sunt foarte accesibili ca pret .
Recently I buyed a new brand from KreativShop, so these will be today subjects. :) They are wonderful, they worked out easily and have an fair price.

Each package of eyelets comes with a helping tool ( with two different ends : one for perforating, one for setting in the eyelet) and with a metal disc which will keep in proper position the eyelet when hammering over.
Oh, I forgot to tell you : you'll not find a hammer in the package, you will need to get one before starting. :))


Se incepe prin a perfora materialul unde se va pune ochetul. Se poate face gaura cu forfecuta sau cu unul din capetele ustensilei ajutatoare din pachet. Adica acesta :
Start by making the small hole in the fabric where you want your eyelet to go . With the tip of your small scissor or with one of the ends of the helping tool from the package. This one :


Atentie : se lucreaza pe spatele piesei .
Asezati prin gaura ochetul cu partea convexa spre fata materialului. Asezati saiba cu partea concava inspre sus si asezati totul in discul de metal . Se va potrivi la fix acolo. Apoi puneti deasupra capatul celalalt al uneltei ajutatoare ( vedeti imaginea ) si cu o miscare scurta si ferma loviti cu ciocanul peste "sandwich". Ochetul se va deschide frumos, ca o floare, peste saiba si va ramine fixat in material .
Aveti in continuare citeva imagini, dar fara material , doar ca sa se vada mai bine actiunea :
Attention : you will work from the wrong side of the piece.
Set the eyelet with the convex part on the right side of the fabric, trough the hole, set the small "washer" with the concave way up and put everything to stand right and properly into the metal disk round space. It will fit like a dream. Then put on top of this "sandwich" the setting end of the helping tool , and with a short and firm move hammer on it. The eyelet will open over the washer like a flower and will remain sett on the fabric.
You have here some steps images but without the fabric just to see better the action :


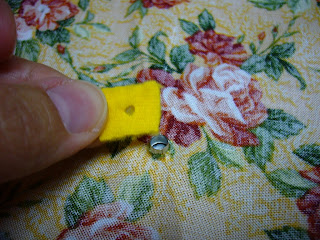
Eu pun o bucatica de fetru sub fiecare saiba doar ca sa fiu sigura ca materialul pretios nu va suferi de la partea metalica dupa lovitura cu ciocanul . Fetrul ramine in loc si da o tinuta mai buna partii montate.
I actually like to put a piece of felt under the washer just to be sure that the fabric will not suffer from the metal . It remain in place and gives a nice extra strenght for that spot. 

You see ? isn't it nice ? it's addictive, believe me. I would set eyelets on everything now :))


saculetul pentru bijuterii (sau pentru lucru de mina ) il gasiti in magazin aici
you can find this jewelry bag here


Aveti si voi niste ocheti sa incercati ? intoarceti-va cu rezultatele si cu idei noi de folosire a lor ;) Abia astept !
Do you have some eyelets to try on ? come back with results, I'm extra-curious for new uses .